Photogravure troubleshooting by greg brophy

I am keeping a running list of problems I have run into and will keep updating as I find more problems so I have a place to reference when I need to.

If the image is too grainy, increase the pressure

If the image is too blotchy, the paper has been soaked too long. You can see spots where the paper composition has changed.

The paper sticks to the plate, the paper is too wet. Calendar it to reduce excess moisture.

The paper sticks to the edges only, the plate is too clean, don’t use rubbing alcohol.

The image is grainy and lacking tonal range, the paper is too dry.

If your positive seems too thin or not the right color, make sure you print through Adobe Print Utility or Print Tool to make sure you are not adding a profile.

If you get splotchiness in the midtones (the dreaded midtone measles) Dry the positive with a hair dryer for two minutes.

Using a squeegee or roller – if you have marks on the plate that run in one direction, you are pressing too hard .


Photopolymer Gravure by greg brophy

I originally went to school for art and have a degree in Illustration. In the last year of school, I realized that photography was really what I loved to do. I learned in the darkroom with large format film, but with the advent of digital photography, I was missing the handmade touch I was used to with the darkroom and with painting. The smell of oil paint and turpentine, the feel of real paper, the magic of seeing an image appear magically in front of you. To get back to that feeling, I have been learning many different alternative photographic processes over six years to find the process that gave me that hands on approach to printing that also matched my vision. I have done Platinum/Palladium, Color Gum Bichromate, Carbon Transfer and most recently Photopolymer Gravure. Most people are familiar with Platinum prints and maybe even Carbon, but even photographers who practice many of these processes have not heard of photogravure.

 So, what is Photogravure?

Photogravure is one of the oldest photographic printing processes and is one of what is called the big three, Platinum, Carbon and Photogravure. These three processes are considered the most stable and most archival processes available. The way a photogravure is made is by taking a positive image and contact printing it onto a piece of carbon tissue, usually red ochre in color, that has been sensitized with a dichromate. The carbon tissue is then mated to a piece of copper and etched in an acid bath. The resulting piece of copper is then inked like a traditional etched plate (think Rembrandt or Goya) and then run through an etching press on to a piece of paper. This process is long, expensive, chemically hazardous and very difficult.  There are still a few artists around who still do traditional photogravure onto copper plate, but with the banning of the use of dichromates in Europe and other countries, who knows how long artist will be able to continue this way.

Here are some famous photographers who practiced Photogravure:

Alfred Stieglitz - The Flat Iron

Alfred Stieglitz - The Flat Iron

Edward S Curtis - Bear’s Belly, Arikara Indian half-length portrait facing front wearing bearskin

Edward S Curtis - Bear’s Belly, Arikara Indian half-length portrait facing front wearing bearskin

Edward Steichen - Rodin

Edward Steichen - Rodin

Paul Strand - Blind Woman, New York

Paul Strand - Blind Woman, New York

Now that I have explained Photogravure, what is Photopolymer Gravure? For a while now, artist who produce etchings have been looking for a less toxic way of making plates that don’t required acids or dichromates. Some of these are thin polymer films that can be put onto plastic or different types of metals. There are also readymade plates coated with polymer films. Toyobo KM73 plates and the Jet LSL-73-SP are two of the most popular ones for photogravure. The main advantage to the photopolymer process is that you only need room temperature water to process them instead of Ferric Chloride. This doesn’t mean they are entirely non-toxic, but with a pair of latex gloves you can mitigate any toxicity from them. These plates are then inked and run through an etching press the same way as traditional copperplate photogravures are. The results have even better tonality than traditional Photogravure. I spent a year trying to learn myself and decided that I needed help so I took a workshop with Mark Nelson, the creator of Precision Digital Negatives. It was truly helpful in learning all the small things that make a big difference. To not obsess to much about charts and learn by making real images.


I have been working on “The Iron Triangle” Series for around 5 years now and was looking for a process that matched the spirit of the place I was photographing. I tried platinum and carbon, but in the end, after making my first photopolymer gravure, I knew this was the right process. The grit of the images finally matched the depth of the ink on paper. The range of tones and the way it renders textural details was breath taking. Don’t get me wrong, I love Platinum, but that process seems better for trees in fog type landscapes or images with subtle tonal gradations. Carbon is also wonderful, but in the end Photogravure really shines for me. The ability to use different inks like mixing paint and any type or color paper is liberating and gives me back the creative control I was missing with other processes.


I am currently working on a portfolio of “The Iron Triangle” printed completely as Photogravures. That’s 60 images overall and I have been waking up every day at 4am to create them. Once they are done I will be creating more images for sale from my travels through Spain and Italy so be on the lookout for those soon.


Here are a few images that I have printed and photographed so far:

Paper: Somerset Satin White Ink: Graphic Chemical Bone Black Plate: KM73  Size: 8x10 image 13x15 paper © Greg Brophy 2018

Paper: Somerset Satin White Ink: Graphic Chemical Bone Black Plate: KM73  Size: 8x10 image 13x15 paper
© Greg Brophy 2018

Detail of Royal Field

Detail of Royal Field

Paper: Somerset Satin White  Ink: Graphic Chemical Bone Black Plate: KM73 Size: 8x10 image 13x15 paper

Paper: Somerset Satin White  Ink: Graphic Chemical Bone Black
Plate: KM73 Size: 8x10 image 13x15 paper

Detail

Detail

Paper: Somerset Satin White Ink: Graphic Chemical Bone Black  Plate: KM73 Size: 8x10 image 13x15 paper

Paper: Somerset Satin White Ink: Graphic Chemical Bone Black
Plate: KM73 Size: 8x10 image 13x15 paper

Detail

Detail

Paper: Somerset Satin White Ink: Graphic Chemical Bone Black  Plate: KM73 Size: 8x10 image 13x15 paper

Paper: Somerset Satin White Ink: Graphic Chemical Bone Black
Plate: KM73 Size: 8x10 image 13x15 paper

Detail

Detail

Paper: Somerset Satin White Ink: Graphic Chemical Bone Black  Plate: KM73 Size: 8x10 image 13x15 paper

Paper: Somerset Satin White Ink: Graphic Chemical Bone Black
Plate: KM73 Size: 8x10 image 13x15 paper

Detail

Detail

Nuarc 26-1K photos of the inside by greg brophy

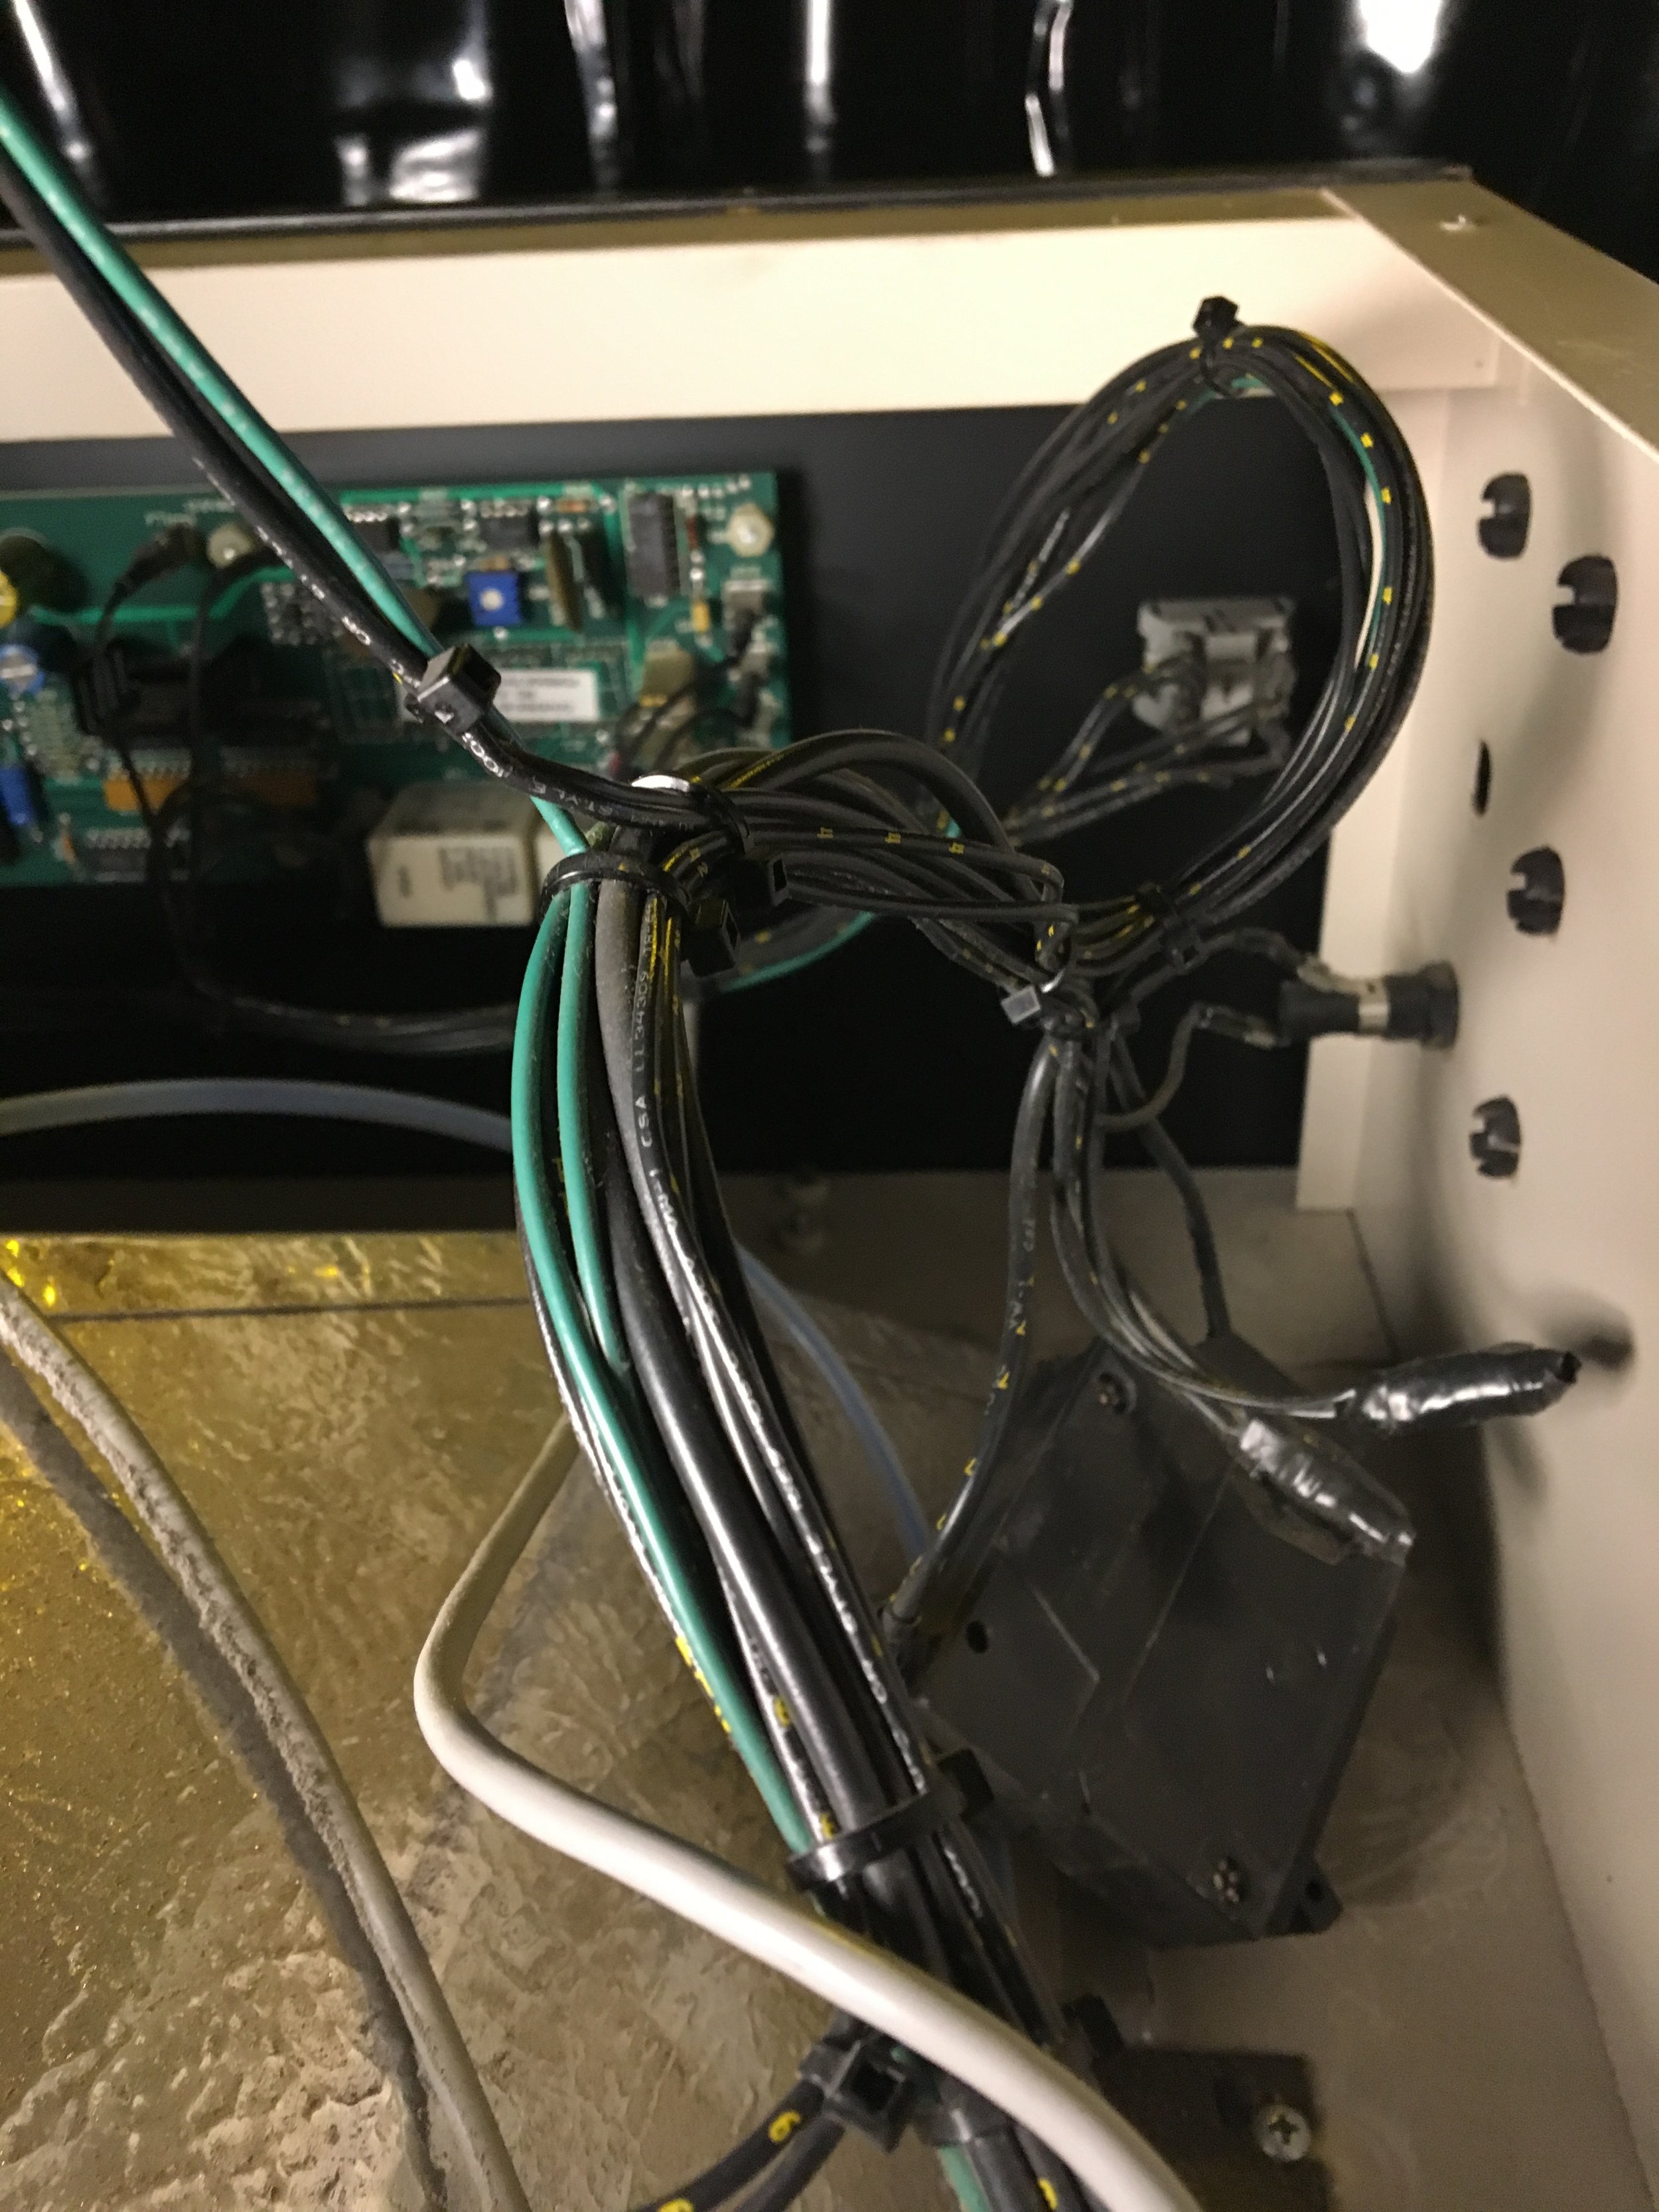
Recently I have had a few people ask me for photos of the inside of my Nuarc. Mine is a little different in that I have removed the vacuum button and placed it else where so that I can use it with other light sources. Here are the photos for others who may have bought a used one or might need to see where things are connected. 


back of front panel. The empty hole on the left is where the vacuum guage was. 

back of front panel. The empty hole on the left is where the vacuum guage was. 

IMG_1960.JPG
IMG_1957.JPG
The back where the power cord comes in

The back where the power cord comes in

IMG_1952.JPG

Where the power cord attaches

IMG_1951.JPG

Right side back panel

IMG_1942.JPG

The whole back panel with the light integrator in the center


Behind the Photo - Ali by greg brophy

One of the first people I photographed in Willets Point was Ali. Ali is from Afghanistan and came here after his brother Frank moved to the United States where they started the New Mustang Auto Parts store in Willets Point 15 years ago.

Read More

Contributions by greg brophy

I have spent a over a year learning carbon printing without one good print that I would be willing to hang. I have spent a considerable amount of money learning this process. The same goes for Platinum/Palladium printing. I have stacks of paper and material that will never see the light of day.

Read More

Behind the Photo - Junk Yard Dog by greg brophy

This is the first post in a series where I explain the backstory of the photos from The Iron Triangle.

Read More

Photopolymer Printing by greg brophy

A short post about Photopolymer printing and some instructions on how to do it. 

Read More

Easy Way to coat Tosa Washi Paper Using Glass by greg brophy

I have written before about this paper and I love it. Here is a great video on a great way to coat the paper from Masayuki Nishimaru: 

A Return to Willets Point Part 2 by greg brophy

As I wrote in the previous post "A Return to Willets Point" I went back to take some more photos and see how much of the area has changed. While walking through the area I saw a group of men doing body work on a car and spotted this guy covered in Bondo. I asked his name but didn't want to say but let me take his photo. 

Blanco y Rojo

Around the corner we met John who was eating some birthday cake. He was hesitant to have his photo taken but he agreed in the end. On a side note, most people there do not want to have their photo taken. It takes about 3 trips for them to see me and feel comfortable. 

Cake and Eat it Too

Since we came back we also brought prints with us from the last time we were there. We meet up with Frank who is also know as Ponchee. Here is his photo from the first time we met: 

Then known as Frank

Ponchee now

On my first trip I took a photo of two sisters selling drinks. We could not find them again but we meet their brother Ricki. He gave the photo we took of his sisters to them.

Ricki

A Return to Willets Point by greg brophy

Permits to tear the place down

It’s been a while since I have gone back to Willets Point. Eni and I went to visit a week ago armed with photos we had taken on the last few trips to give back to the people we photographed last time we were there. We were surprised and delighted to see many of the same people we had photographed before. They were really happy that we returned and gave them back something. We were also able to create some more interesting photos.

One thing I noticed was how much the area has change. The first photo below is from my first trip there in 2014 and the photo on the right is what is there now. They are turning this part into a parking lot. Right next-door is a huge parking lot that sits empty most of the time so I am not sure why someone felt compelled to build another one. The car in the photo on the right belonged to the security guard there who told me I was not allowed to take photos there.  In three years of taking photos there, this was the first time I was told that.

Willets Point 2014

Willets Point 2016

While finding and giving out some of the photos, we meet one of the owners of several properties in Willets Point. He owns at last one full block, if not more. He did not want to be photographed, but was more than willing to talk to us. His name is Eli and he bought the property in the 80’s for 1.6 million. He told us his wife thought he was crazy. Now they are offering money in the range of 50 million and he still refuses to sell it. Eli told me that a lot of people depend on him for jobs and for an affordable place to get their cars fixed. Otherwise they would pay double to get it fixed at most garages in the city. After Eli is gone, maybe his kids or wife will sell it, but not while he is still living.  The problem that Willets Point faces now, according to Eli, is that half the building are empty now and the city has done nothing with them leaving it open for drug addicts to use late at night. Business is also down because people are not coming as much. They think that nobody is there anymore working on cars.

Reconnecting and giving photos back to the people who work there.

Across the street from Eli is Ali who has had a business in Willets Point for over 20 years. He ran it with his brother Frank, who has passed away. Ali told us that he rents from someone who also owns a large section of Willets Point. He pays $10,000 a month and is worried that at any moment they could sell he would have to move. We asked where he would go and he was not sure. Ali came from Afghanistan back in the 80’s with his family. He is extremely knowledgeable about cars and has a mental record of every part in his garage.  Ali’s main complaint was the lack of infrastructure in Willets Point. He could not get Verizon out to his place to fix the Internet; he relies on a computer system that he uses to see if other garages have parts his customer needs. There is no sewer system and therefore no bathrooms there. Customers ask all the time and he has to tell them no. The roads have not been paved in ages, even though they pay a lot of money in taxes. 

Ali in front of his Garage 2014

Ali in front of his Garage 2014

Ali in his office. Frank was his brother and was the one to put the money from all over the world on the wall. Sort of a shrine for him.

It was good to be back and take more photos in Willets Point. We talked to a lot of people and heard some interesting stories. I will have some more posted soon.