Various tests with Japanese paper and the photogravure process with samples and tips.
Read Morealternative photography
Printing of "Choking" From "The Iron Triangle" series /
Here is a video of me printing “Choking”

New Conrad E-18 Etching Press and Some Process Videos /
After long anticipation, I have finally received my Conrad E-18 etching press. The press is used but look like new. I bought it directly from Conrad Press and it’s an amazing piece of machinery. It is 18 inches wide by 48 inches long with two 4 inch solid steel rollers. The press is smooth and rolls like butter and is easy to adjust with the micro gauges.
Here is another video of “Twilight” from “The Iron Triangle” series. For a long time I have been trying to print this image with smooth skies but have not been able to do this until now using Direct to Plate printing that I learned from Silvi Glattauer. I have been using Jet plates instead of Toyobo KM73 plates due to issues with mottling. I contacted Toyobo but they were unable to provide an answer.
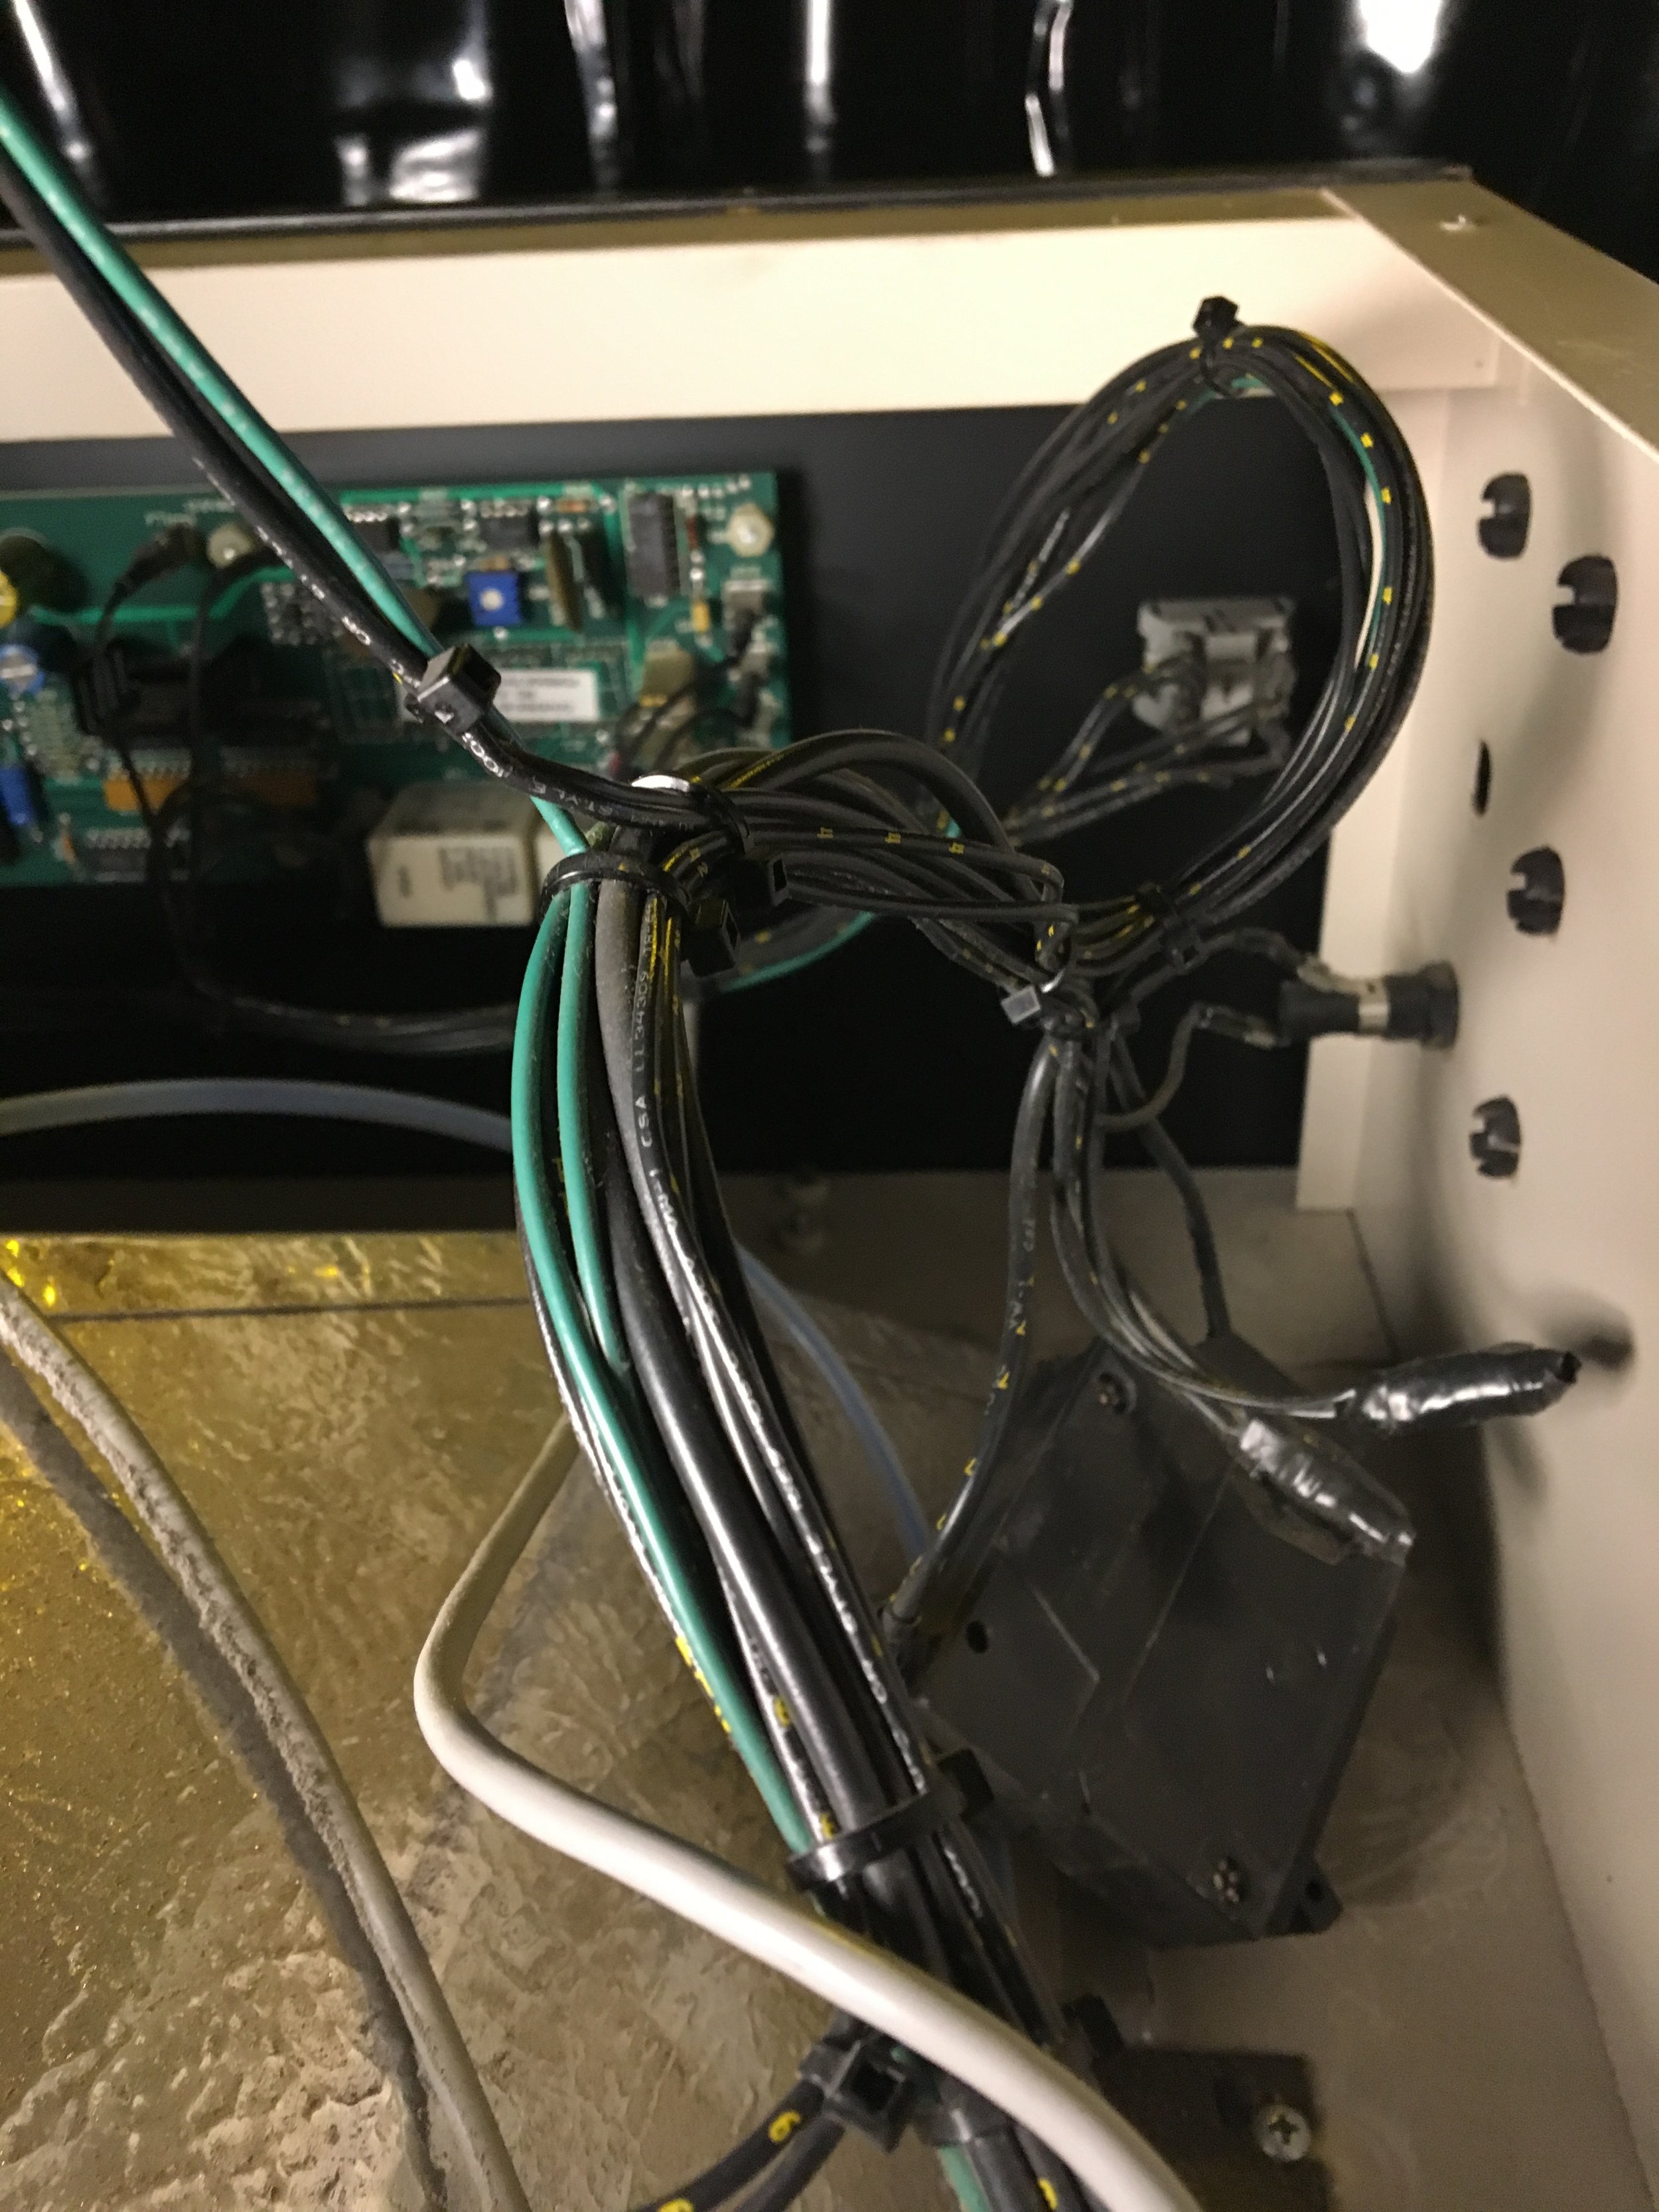
Nuarc 26-1K photos of the inside /
Recently I have had a few people ask me for photos of the inside of my Nuarc. Mine is a little different in that I have removed the vacuum button and placed it else where so that I can use it with other light sources. Here are the photos for others who may have bought a used one or might need to see where things are connected.

back of front panel. The empty hole on the left is where the vacuum guage was.


The back where the power cord comes in

Where the power cord attaches

Right side back panel

The whole back panel with the light integrator in the center
Notes on the new Hahnemuhle Platinum Rag /
Hahnemuhle Photo Rag shot with iPhone
Fabrino Artistico Natural White shot with iPhone
I received some test samples from Carol over at Hahnemuhle and here is my first try. When I share about my experiences of products I used and my process, I like to not only show images that worked well but also ones where I had failures. I find that people can learn more from my mistakes than images that were successful.
I usually use Fabrino Artistic Natural White. I like Fabrino because it is easy to coat. It’s almost idiot proof because it soaks everything up very well, but that can also be a problem. Because it soaks so fast, you have to coat it very fast. The other problem is that it takes so much more solution to coat it. The color of the paper can also be an issue. I find the Natural White is a little too warm and the Extra White is almost blinding and too bright. The new Hahnemuhle is a perfect balance between the two.
When coating, there is nothing more frustrating when you don’t coat fast enough to cover the area and you have to toss the paper with all the chemicals in it. That’s why with Fabrino; I use a higher drop count than usual. The new Hahnemuhle paper uses significantly less solution and takes more time to soak in allowing you to easily cover the surface. Since it does take longer to soak in, I found myself over brushing the paper and it showed on some of my first tests to determine the maximum black. I got lazy with coating Fabrino and I guess it’s time to improve my coating skills.
Fabrino paper sometimes can be very forgiving of all my mistakes, where as I find with Hahnemuhle it is less forgiving. After I coat my paper, I wait for the paper to dry to an even matte color, and then I hang it in front of a fan. The drying time for Fabrino is 2 minutes drying on the table after coating and 2 minutes in front of a fan. For the Hahnemuhle, I waited 4 minutes on the table and 3 minutes with a fan and the negative still stuck to the paper. After that, I dried the Hahnemuhle paper a couple minutes longer and had no problems.
When it came to developing, with my first print I did not pour the developer on properly and got waves (UPDATE: this had nothing to do with the developer, it was sticking to the negative) in the Hahnemuhle so that’s another area where I need to improve my skills and got lazy with Fabrino. When I clear my images, I use a Citric Acid bath and two EDTA and Sodium Sulfite baths and found that there was a slight fogging in the whites (UPDATE: I now use eual amounts of citric acid, edta and sodium sulfite in three bathes for 5 minutes each. The fogging was actually due to old Ferric Oxalate. With fresh FO is clears extrememly well). This may just need to be cleared differently or might be more sensitive to external lights
When I make my digital negatives, I use they method taught to me by Carl Weese. I use the Color Density in the Advance Black and White with Epson to control the highlights. With Fabrino I regularly printed at the max +50, but I think with the Hahnemuhle I need to take it down to maybe +40. The image above has a little more contrast than the actual print. When developing, the image looked very grainy when I first poured the developer on it, but that goes away as it develops.
As for printing times, I use a UV LED light box I made myself. The printing time for Fabrino and Hahnemuhle was exactly the same for me. I found the blacks to be slightly less then the Fabrino but only really noticeable side by side. The Hahnemuhle is also more neutral in color. (UPDATE: For a warmer color use Potassium Oxalate 180g, Potassium phosphate monobasic 60g, Distilled water 1000cc, the higher the temperature, the warmer it will be. I am usually at around 100 to 120 degrees.) I am printing with Ferric Oxalate and Palladium only for these images. I like to get it as close to perfect with just those two before adding any contrast agent. Often times I do not use any NA2. The other major difference between the two for me was the sharpness of the image. The Fabrino has more texture and a little more soft. The Hahnemuhle to me was much sharper and crisper.
In the end, with more time and paper to perfect the process, I see myself using the Hahnemuhle only unless I want a very warm image then I would use the Fabrino. Thanks again to Carol for the samples. I am looking forward to getting the paper.
Hahnemühle Platinum Paper /
According to Christina Z. Anderson, a new Alternative Process paper that sounds perfect for Platinum Printing is coming out soon from Hahnemühle. See the details below. If true it really sounds incredible.
Read MoreHow to make a UV LED Exposure box /
Up close on the UV LED exposure box
UPDATE
I made this box about a year ago and after 1 years use, I am not sure I would still recommend doing this. I went to add some more lights to the unit this week and noticed that the lights, which have a plastic waterproof coating over them had yellowed and that the new lights which were the same as the original were much brighter. I read the reviews of the LEDS on Amazon and a lot of people complained about the same thing. They only thing I can think of is to use LEDS without the waterproof cover and that are of better quality.
I have a Nuarc 40-1K and an fluorescent exposure box I made and decided that I needed something quieter, cooler and less power hungry so I made a UV LED exposure box. I put this information together from these two links:
https://www.youtube.com/watch?v=jLia59KfkSw
Before we start, I am not an electrician and you do this at your own risk.
The video is an excellent source for some of what you need and how to wire it. The process I did required soldering. I learned how to solder a long time ago and it’s really not hard. You may be able to do it without soldering but I do not trust the long-term ability of the clips to keep the connection. I created a really large UV light box at about 30x36 inches but it’s easier if you do something like 20x24. I made mine that large to fit over the vacuum frame I have.
The UX exposure box I made gives me a maximum black at about 12 minutes with Fixxons transparency material that I use for my digital negatives. Right now, the height is about 4 inches from the negative. This may change but it doesn’t really matter much if it is 4 or 6 inches. The LED strips are 3/8ths of an inch wide and I centered them on an inch strip (30 inches for 30 strips). The video shows the lights really stacked on top of each other, but so far I have gotten pretty even light with some space in-between. I also staggered where they begin and end so that the coverage is more even and not just strips of LEDS horizontally. The video does a good job of explaining this. You do not need the battery or the extra stuff he shows in the video, just the power transformer.
Results from a 10 minute exposure using the UV LED exposure box. It could use a couple more minutes.
When you cut the LED strips, make sure it is between the two copper points (about every three LEDs). Make sure all the strips go in the same direction. How can you tell? Well when you line them up, you will see at the ends of the LED strips, two copper dots, one negative and one positive. The ends should match, so for instance all the negative copper terminals should be on the top and the entire positive terminal on the bottom. This way it makes it easy to line up and solder. You are going to take the 12 AWG wire (basically speaker wire) and have it go through holes you have to make in the center of the short sides. The speaker wire is a paired wire, one wire to go to the top and one to go towards the bottom. It doesn’t matter which is which. Start on one side and strip the red and black off so that it reaches just past the leds. Give it about an inch from the top of the LEDS. Staple this down and start soldering the small copper wire to each one. For the one side you want the negatives and the other side the positives. You do not do all of them on both sides.
Once you are done, test with the power supply. You should have three positive and three negative connections on the power supply. The one 12 AWG cord (with the red and black cord inside) from the right should go into the positive connections on the power supply and the one cord from the left should go into the two negative terminals. Which side doesn’t matter as much as long as the wires soldered to the negative side of the LED terminal is plugged into the negative connection on the power supply; same with the positive. Then connect the power cable, black is live, white is neutral and green is ground. Plug it in and step back. The lights take about 2 seconds to turn on. Once it is all working, flip the board over and attach the power supply to the board and you are done.
I have saved everything I have used into a wish list from Amazon or you can check out the links individually below.
Wishlist
http://amzn.com/w/2HOSLC2PAO93S
I will keep updating this with more images and better directions as this process evolves.
Here is a schematic I made:
UV LED Exposure Box Schematic from underneath. Click to view larger size.
Power supply – can power 5 reels of lights at a time (Shipping says it will take a month but I got it in two days)
http://www.amazon.com/Lemonbest-Power-Transformer-Lighting-billboards/dp/B00NHDYMG0/ref=sr_1_72?s=hi&ie=UTF8&qid=1432303393&sr=1-72&keywords=led+power+supply
UPDATE: I would also strongly suggest getting a plastic ABS box and drill some holes in it for ventilation.
https://www.amazon.com/gp/product/B005T990I0/ref=oh_aui_detailpage_o01_s00?ie=UTF8&psc=1
Connect led strips together
http://www.amazon.com/Connector-Single-Color-Strip-Adaptor/dp/B0085ZX8EM/ref=pd_sim_60_1?ie=UTF8&refRID=1A8TXKYN14J7DC1AP0VG
OOK 50162 20 Gauge, 50ft Copper Hobby Wire
http://www.amazon.com/gp/product/B000WC8ULM?psc=1&redirect=true&ref_=oh_aui_detailpage_o01_s00
Check update at top: Wit-Lighting 16.4ft 5050 LED Strip UV Purple 395nm-405nm 5M 300 SMD Flex Light Waterproof IP65 12V DC DC 12V 5A for 5M 300LED light strip Viewing Angle : 120° Wavelength:395-405nm Long life span 50,000+ hours (Shipping says it will take a month but I got it in two days) This is what I used, but would not recommend, they turn yellow and lose brightness in a year.
http://www.amazon.com/gp/product/B00MRJ0AB6?psc=1&redirect=true&ref_=oh_aui_detailpage_o02_s00
500w DC12v Output Switching Power Supply Adapter Non-waterproof LED Driver transformer for LED Strip Light (for reels of 6 or more)
http://www.amazon.com/gp/product/B00MPBT9N6?psc=1&redirect=true&ref_=oh_aui_detailpage_o03_s00
Power Cord
http://www.amazon.com/Superior-Electric-EC123-Feet-Electrical/dp/B002S9J5I4/ref=sr_1_2?ie=UTF8&qid=1453911246&sr=8-2&keywords=12awg+power+tool+replacement+cord
Cmple 12 AWG CL2 Rated 2-Conductor Loud Speaker Cable for In Wall Installation (White, 100')
12AWG Copper Speaker Wire
http://www.bhphotovideo.com/c/product/1008537-REG/cmple_681_n_12_awg_cl2_rated.html
Calibrating a NuArc 26-1K or 40-1K /
For making platinum prints, I normally use a NuArc 40-1K with a vacuum frame. It's the same as the 26-1K except the vacuum frame is larger. The 26 is for the size of the vacuum frame, 26 inches. While trying to calibrate my exposures, I was having a hard time getting good exposures. 100 units would take 4 minutes. I read on the Yahoo Carbon Printing Group about calibrating them to get the exposure closer to 1 unit = 1 sec. I contacted Israel Martinez from M&R Print ( http://www.mrprint.com 800-736-6431). He walked me through the steps of what to do. I am just passing along information and take no responsibility if you damage your unit or electrocute yourself, so proceed with caution.
First step is to unplug the unit and then remove the lid of the exposure unit.
Side view with the lid off
In this side view, the front of the unit is to my left. What you see above is the lamp and the Photocell. The Photocell measures the amount of light coming from the lamp and shuts the unit off when it has reached the limit of what was set. There are three ways to adjust this to make it more sensitive. The first is to angle down the sensor. You will have to play with it, but I adjusted mine here to angle down by about 5 degrees. It doesn't take much.
The red line is where you set the aperture to.
This is what it looks like with the aperture wheel off.
The second way is to adjust the aperture on the front of the Photocell. 1 is the most sensitive and 11 being the least. You can see a swirl on the face, that is what controls the amount of light hitting the sensor. Unscrew just a little, the screw in the middle and adjust it by turing it to match the red mark. It is usually set at 5, I set mine at 1.
The third way to adjust it is to go to the front panel and adjust the resistor. IT is a blue square box with a white plastic screw on the inside. First you want to turn to all the way counter clockwise to as far as it will go and mark that with a sharpie. That makes it less sensitive. Then turn it all the way clockwise until it stops and mark that. This makes it the most sensitive. Now turn it back counter clockwise until it is about center between the two and check it. I would caution not to set it too far clockwise, it may strain the system itself.
Front of case with the resistor
My particular problem was caused by a melted aperture disc. Mine was pretty old and had many years of use and over time, the aperture wheel that protects the sensor from the light clouded up. If you are having problems, I would check this first. The part itself cost $22, but M&R have a $25 dollar minimum and they charge about $14 for shipping so it costs about $40 in the end. It's pretty cheap to replace compared to the rest of the parts. The new and old dials.
The new and the old aperture dials.
I put it in this morning, tested it and it was a little faster than 1 to 1 so I will have to slow it down a little. Thanks again to Israel Martinez from M&R Print, they have always been very helpful.